Last Updated on January 6, 2022 by XDA Team
To connect your Android with your PC and transfer any kinds of files from one device to the other, the Android CDC driver is required. In this article, we are going to let you know how to download and install an CDC Serial driver to your PC and get the full advantages of it. Let’s begin.

What is the Android CDC Driver?
You may ask about what is CDC driver Download and what can we do if we download and install this driver. Well, the USB CDC driver MTK is an import driver that will help Android users to connect their MediaTek devices to the PC. To simply put, this works as a bridge between your Android device and your computer if you want to transfer and share files from these platforms.
Download Andorid CDC Driver Latest Version
If you have a CDC driver installed on your device, it becomes really easy to send any information and personal data such as contacts, messages, files, pictures, audios, videos, etc. However, if you can connect your Android and the computer with this Latest CDC driver, it is also possible to flash stock firmware with its help. We hope that you now know why having an Mediatek CDC driver installed is so important.
How to Download Android CDC driver for Android:
If you are looking to know how to download the Android CDC driver for Android, we are here going to help you. Before downloading the CDC Serial driver for your Android, you should know that you require to have at least a PC that comes with Windows 7 OS version. It is even better if you have Windows OS with 8/ 8.1 /10 version. However, you also need minimum storage to accommodate this driver on your PC. Again, we would suggest you download the CDC Driver Lenovo Latest Version to stay updated. If everything goes right, you can proceed to CDC Driver Download For Android. Click below to download the CDC Driver Android:
You May Also Like: Mediatek USB Driver
Steps to install Android CDC Driver Latest Version
To install the latest version of Latest USB CDC Serial Driver Via Xdarom to your PC, you have to follow the steps below:
Step-1: Go to Settings > Control Panel > Device Manager to open the device manager. Win+R key pressing and then typing ‘devmgmt.msc and then pressing enter will also work.
Step-2: Opening the Device Manager, find the “Action” button on the top left corner. Now, click on “Add legacy hardware’ to proceed.
Step-3: Now you will see a new wizard for adding the hardware. You have to simply click on the “Next” button.
Step-4: Now select to Install the hardware from the list (advanced) and proceed to the “Next”t button.
Step-5: Under the heading of “common hardware types”, you will have the chance to select “show all devices” and then click on the “Next” button.
Step-6: Now it is time to pick the driver location. Locate “Android_Gadget_CDC_driver.inf “ by going to your Hard Disk storage.
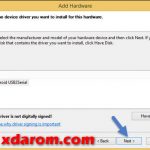
Step-7: When you get your driver listed on the blank area, click on “Open”. Now you will see a new window to ask the installation. Press “Next” to continue.
Step-8: Now you will see a new Windows Security dialog box to let you confirm whether you want to install this drive. You have to choose to Install this driver anyway.
Step-9: Now, you are done. Click on the “Finish” button. You have successfully installed Android CDC Driver For Windows 10 Latest Version.

Final Words:
After installation of the Android CDC Driver Latest Version, you are supposed to be able to transfer files including images and videos between your Android device and PC. We hope that this step has helped you to download and install the driver successfully and get benefitted from the advantages of this drive.
Related posts: