Last Updated on January 4, 2023 by XDA Team
Wondering how to get the real image of ISP Pinout? Since you have landed in the best place, our expert knowledge can help you achieve it. Also, we will walk you through the perfect way to test point for the Vivo Y12.

Wondering how to get the real image of ISP Pinout? Since you have landed in the best place, our expert knowledge can help you achieve it. Also, we will walk you through the perfect way to test point for the Vivo Y12.
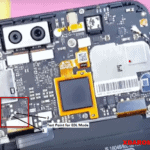
Vivo Y12 Test Point
The full meaning of ISP is In-System Programming”. The main objective of this problem is to allow communication with a particular ship without removing it.
You can be benefitted from this approach because it lets you communicate with a particular chip, eMMC or eMCP, bypassing the CPU.
Unlike JTAG, ISP is capable of bringing increased speed to extract data. However, it needs to have extensive soldering skills.
The main purpose of the ISP method is to extract and download the entire memory content from a particular device. But you have to connect it to an eMCP or eMMC flash memory chip to achieve this objective.
Vivo Y12 EDL Point | Vivo Y12 Test Point
- Firstly, turn off your mobile.
- Opening the backside of the mobile is necessary. Some handy tools can be used to open it.
- Next, locate the device motherboard, and detach various components. Look for the connectors that are attached to the camera and battery. Disconnect them carefully.
- Now, figure out the location of the eMMC chip. Open the steel cover of it.
- Once you open the motherboard fully, some small square-shaped boxes will be visible inside it.
- Now, grab your UFI box adapter. There are 6 round hole points that will be visible with different names.
- Locate to the eMMC chip of your motherboard and find out the similar 3 points from the board. Normally, they are easy to discover from the square-shaped box.
- After finding the exact three square-shaped boxes, you need to connect them with the round points via soldering jumpers. Avoid connecting to the wrong wire. Otherwise, it will damage the UFI box.
- Now, you need to connect the motherboard to the battery connectors and attach the adapter to the UFI box.
- Finally, make a connection between your computer and the UFI box.
Whenever you want to go for a dead boot for your Vivo Y12 phone or any other phone, normally, two dongles rank top in the market. One is a UFI box, and the other one is JTAG plus.
You can utilize these boxes when you mistakenly flashed the incorrect firmware. By utilizing these boxes, you can use this boot repair.
Also Read:
Download Vivo V9 Flash File, Test Point, And EDL Point
How to Unlock Vivo Y12 With UMT Dongle Step By Step Guide
If you are wondering how to boot your Vivo Y12 mobile, follow the below instructions.
Method 1: Using ADB
- Now, connect the Vivo phone to your laptop or computer.
- Finally, write this text on the command box and press enter:”.\adb reboot edl”
Method 2: Using Fastboot
- First, get the ADB and Fastboot Tool from this link. After downloading it, extract it on your C drive.
- Next, you need to boot your Android mobile into its bootloader system.
- Finally, write this text on the command box and press enter: “.\fastboot oem edl”
How To Remove Vivo Y12 FRP Lock Using UFI Dongle:
- At first, inspect the “Direct eMMC (ISP).”

- Next, tap on the “Identify eMMc
- Now, grab a USB cable to connect the mobile phone to the computer
- Go to the Computer setting panel and navigate to the Device manager
- When you see your Vivo Y12 is visible on the Device manager, run UFi Box.
- Now, visit the USERAREAPART from several options of the Device manager
- Next, select Special Task, followed by [Vivo] MasterClear and Wipe Data Only.
- Finally, choose the Special Task, followed by Clear FRP Lock.
Download Vivo Y12 Firmware (All Version)
- Vivo_Y12_PD1901BF_MT6765_EX_A_1.9.13_20052019
- Vivo_Y12_PD1901BF_MT6765_EX_A_1.12.4_11062019
- Vivo_Y12_PD1901BF_MT6765_EX_A_1.13.3_24062019
- Vivo_Y12_PD1901BF_MT6765_EX_A_1.16.6_27092019
- Vivo_Y12_PD1901BF_MT6765_EX_A_1.18.1_31102019
- Vivo_Y12_PD1901BF_MT6765_EX_A_1.19.7_01122019
- Vivo_Y12_PD1901BF_EX_A_1.50.9_OTA
- Vivo_Y12_PD1901BF_MT6765_EX_A_1.70.8_220121
- Vivo_Y12_PD1901BF_MT6765_EX_A_1.70.9_020721
- Vivo_Y12_PD1901BF_MT6765_EX_A_6.71.55_240321
- Vivo_Y12_PD1901BF_MT6765_EX_A_6.72.0_020421
- Vivo_Y12_PD1901BF_MT6765_EX_A_6.72.12_091021
Conclusion
Hopefully, you have learned the perfect way of Unlocking Vivo Y12 with the UMT Dongle step-by-step guide. Make sure to follow the procedure correctly, as every phase is crucial to follow.
Additionally, be cautious while performing this task since wrong actions may end up harming or damaging the hardware or software of your Vivo Y12. Hopefully, you have successfully overcome the problem.